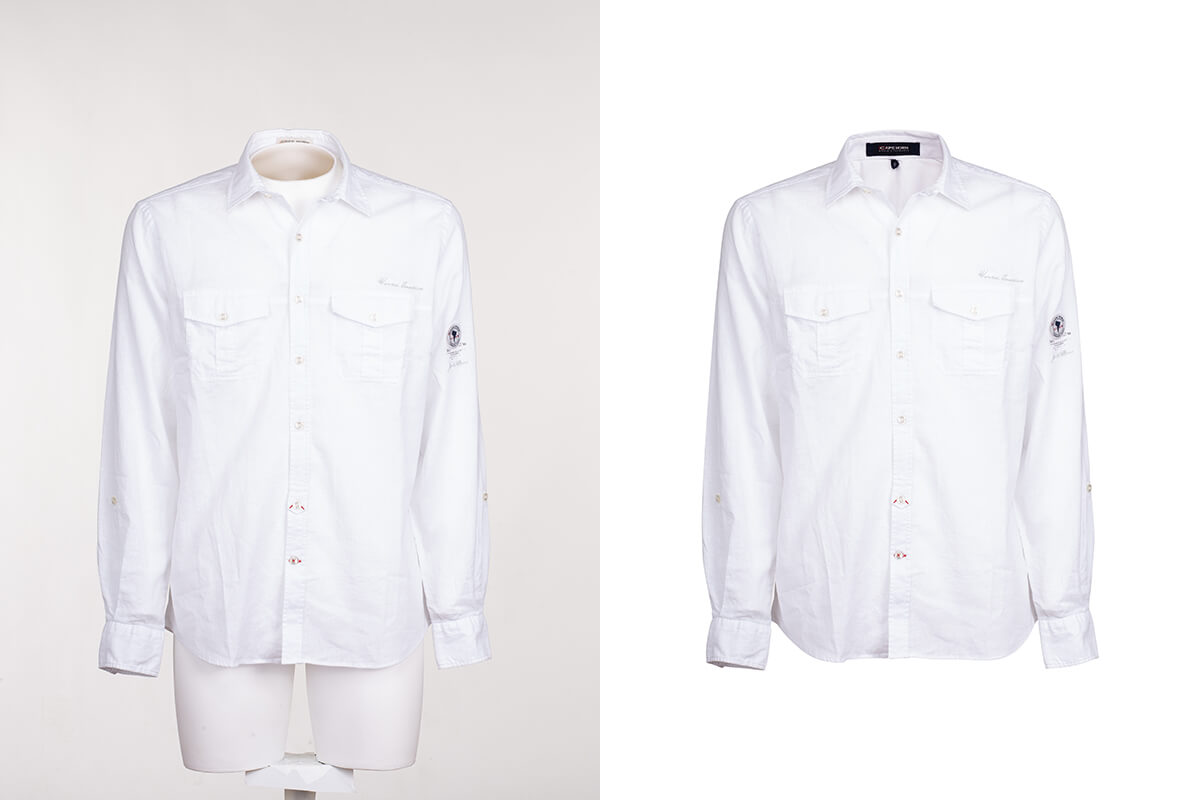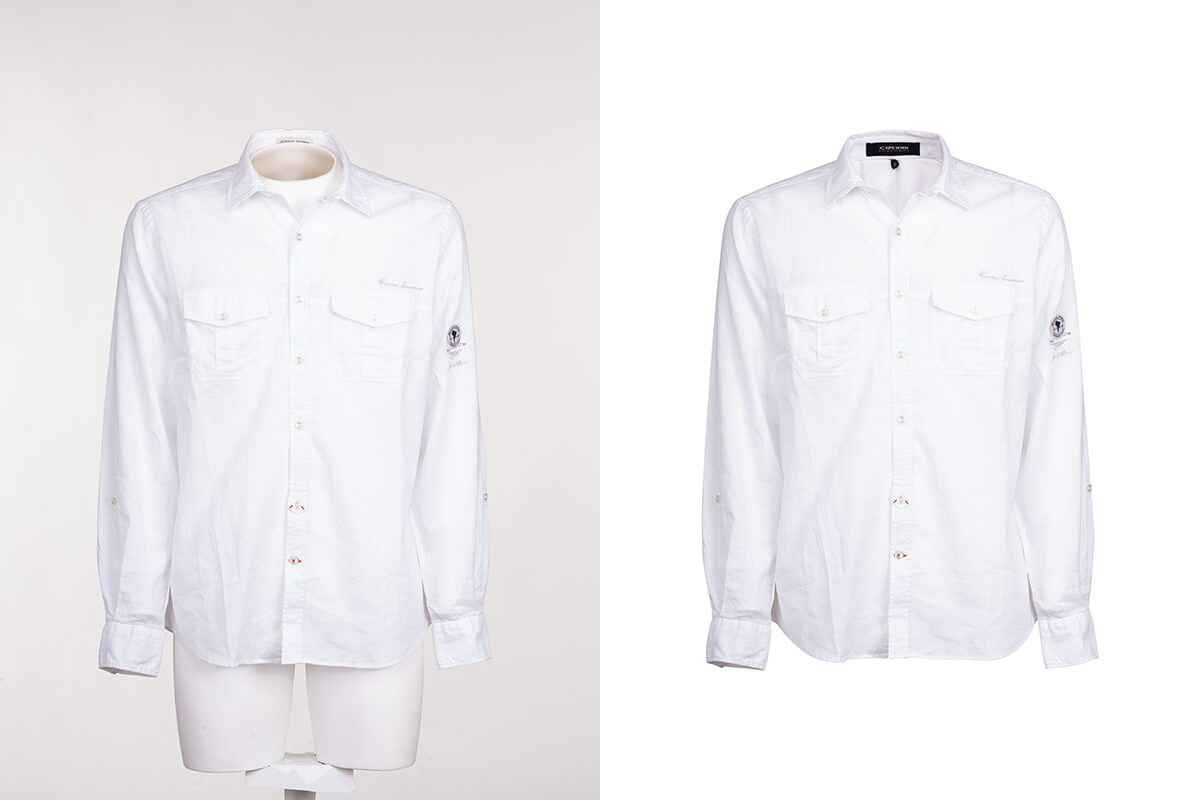
People who have online clothing stores generally use either a live model or a mannequin in photographing products. Compared to a live model, mannequins are more efficient and are more cost-effective. It is usually referred to as ghost mannequin photography since the final photos do not show the mannequin itself. The tricky thing about it is that with a ghost mannequin effect, the clothes are shown with a 3D or hollow man effect. This is a genius way of showing the customers how the clothes will look like when worn.
Although there are recommended steps in doing ghost mannequin photography, there is actually no particular set of ways to create this 3D effect. In fact, the techniques will vary according to the type of clothing being photographed. Accessories, like jewellery, also use the same techniques in order to achieve the same effect.
Why Is It Important to Learn About Ghost Mannequin Photography?
In the world of retail, you need to stand out against the competition in order to increase sales. There are many established ecommerce websites and online sellers that you are competing with hence the need to improve your styles in presenting your own products. Ghost mannequin photography is one of the most creative ways to make the customers appreciate the clothes that you sell. By mastering invisible mannequin photography, you get to present professional-looking clothes that look better than photos using flat-lay photography.
Best Resources or Tutorials to Learn About Ghost/Invisible Mannequin Photography
To guide you in learning all about the hollow man effect, here are several resources that you can use. They are very easy to follow tutorials and will surely make you master this technique in no time:
1. How to Photograph a Shirt on a Ghost Mannequin
Creating the ghost mannequin technique will be tons easier if you have the best source material. This means that you need to shoot the clothes on the mannequin correctly.
In this tutorial, you will be taught about how to effectively create the 3D effect by styling the shirt the right way. Getting it right means taking shots at multiple angles in order to get every detail of the product. It will teach you how to make the clothes look better after being photographed by folding and tucking certain parts with every shot. This will ensure that you have great photos to work with during post-production.
2. Tips on Photographing Your Clothes Using a Ghost/Invisible Mannequin
For this tutorial, you will be given five tips on how to photograph your clothes using the invisible mannequin technique. Aside from teaching you about high-end retouching, you will see how modern mannequins have become that you can actually take the parts apart in order to achieve the best shots without any surface of the mannequin showing up. This is actually great since it will lessen the necessary steps in editing out the white/mannequin parts from the photos. If done right, you will have the best ghost mannequin photos for all your products.
3. How to Create Ghost Mannequin in Photoshop
Photoshop is one of the most popular applications that let you achieve professional-looking product photos. Photo editing services providers use it so it will be an advantage if you learn about it too.
In this tutorial you will be guided through using a step-by-step video lesson that you can follow on your own Photoshop app. The video is a live demonstration of how you can create the ghost mannequin technique on a shirt. This tutorial is great both for those who are already familiar with how Photoshop works, and those who are just learning to grasp its different functions.
The best thing about this tutorial is that you will be taught how to get into the tiniest details of the photo so you can perfectly cut out the product from the background. This will result in a professional-looking finish as if your photos have undergone high-end retouching through a clipping path service.
4. Photoshop Ghost Mannequin Effects Editing Service
A neck joint service is among the most popular image editing services offered for online shop owners. While this type of service is generally inexpensive, it will also be fun to learn how the professionals do it.
This is another Photoshop tutorial about invisible mannequin technique where a live model is used instead of a mannequin. The highlight of the video is teaching you the importance of getting the neck joint right and perfectly aligned. This step is very important to master since it will give your photos a seamless and accurate finish.
5. Ghost Mannequin / Invisible Mannequin Photo Editing Using Photoshop
Invisible mannequin photography is encouraged if you do not want to have product photos that look lifeless in flat-lay photography. It is essential that you learn how to create depth and dimension to the final photos. With this tutorial, you will learn more tips on how to get artistic with your shots and how you can effectively create the 3D effect on a variety of products.
Additional Resource:
READ: Invisible Mannequin Photography: Increase Apparel Sales With This Post-Production Technique
The ghost mannequin technique does not end after taking photos of the product. A post-processing of the photos is required to create the 3D effect. The process involves a few steps to combine the photos in order to create an image where the garment will look like being worn by an invisible person. This tutorial is an actual workflow of how the post-production technique is done.
More than the usual image editing services, like clipping path service, there are many other ways to improve product photography for you online store. The ghost mannequin technique is an innovative way of presenting the products to customers.
It may seem difficult at first but with these tutorials on ghost mannequin photography, you will see how easy it can be. Most of the tutorials are short but they will show all the useful instructions that you can apply for doing invisible mannequin photography. Master the steps, learn from the tips being mentioned, and practice the technique until you get it right with your own product photos.

